Mimi’s Basic Dollmaking — Our First Online Tutorial!

Complete 2-Day Dollmaking Workshop
For Beginning to Intermediate Dollmakers
Realistic Cloth Dolls

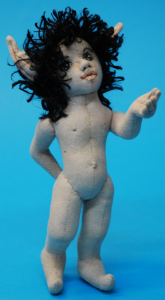
Mimi’s Basic Dollmaking tutorial uses a very easy pattern for a four to five-year old child. The doll is about 10-inches (25-cm), and can be a boy or a girl or neither (and have wings or a fish tail). It uses Mimi’s easy, modular technique for full posing.

  • This doll is so simple that a first-time dollmaker can make it easily and successfully in just a few hours.
  • The Basic Dollmaking doll is the perfect canvas to showcase your needlework by decorating wings, or fins, or clothes, or paint, or embroidery, or beading, or your own favorite expression.
  • There are only six basic pattern pieces, plus a few optional choices such as pointed toes, pointed ears, and flukes and wings.
  • The well-shaped head has a choice of human or “pointy” attached ears, and does not need a face when the doll is made for the display of your needlework.
  • For the more adventurous, there is a fully needle-modeled face. It’s easier than you think with my new directions. There is an easier way to stitch the eyes and make that cute mouth.

Use this body design to create the doll of your dreams, a child, a faery, an elf or a mer-kid to display your favorite form of needle-art on the wings or flukes.

How it Works:

  • 34 video demonstrations.
  • Go at your own pace. (It’s all accessible immediately. No week-by-week handouts.)
  • You don’t have to worry about the class ending before you can participate in the discussion group. The Screaming Mimis is a permanent discussion group.
  • You don’t have to wait for a new class to begin. Start when you’re ready.
  • Everybody on The Screaming Mimi’s is working on Mimi patterns (or their own projects based on what they have learned) and can help you.
  • Jim and I read the discussions every day and help out whenever we are needed. We also schedule live chats with Mimi.
  • The tutorial gets updated as we shoot new video or find easier ways to explain things. If you come back and do it again after a few months, you may find a lot of new things. Just check the “What’s New” chapter in the “Introduction” lesson for a dated list of changes.

What You Will Learn:

  • How to photograph your dolls
  • How to make and use templates
  • What to look for in stuffing materials
  • How to work with knits
  • How to determine fabric stretch
  • How to clean hand sewing needles
  • How to set up your sewing machine for dollmaking
  • How to take care of air soluble markers
  • What kind of thread to use for dollmaking
  • How to clip seams
  • How to ladder stitch
  • How to select hemostats
  • How to make and use a stuffing tool
  • How to stuff a doll smoothly
  • How to make wired hands
  • How to turn fingers
  • How to wire ears
  • How to pin doll parts together with a smooth fit
  • How to attach wings to a faery and flukes to a mer-kid
  • How to locate features on a face
  • How to be sure your eyes are on the same plane and the same size
  • How to needle-model a nose
  • How to needle-model lips
  • How to make dimensional eyes
  • How to color the face
  • How to make needle lace
  • How to make thread paintings

Mimi’s Basic Dollmaking Online Tutorial
10 Lessons, nearly 100 Chapters
Only $30!

Click Here to Buy Now!
(Opens new tab)

You will receive an email in 1-3 business days telling you how to log on, and providing your UserID and Serial#.

You can take a Private, 6-Day Dollmaking Workshop with Mimi!

Mimi’s Modular Mermaid is here! Suitable for ALL Skill Levels!

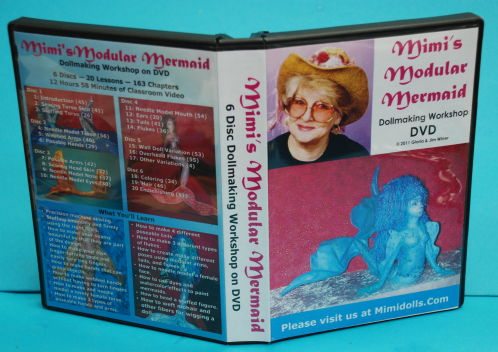
6 DVDs — 20 Lessons — 163 Chapters
— 12 Hours 58 Minutes of Classroom Video!

No Travel Required!

Your own copy is less than 1/6 the cost of a 3-day seminar! Much less when you include travel and hotel expenses!

Learn at your own pace. Ask questions and share your work with me through “The Screaming Mimis Workshop” on Yahoo
Groups, established by Sandra Bejster especially for folks making my dolls.

Below are the new introduction video and the new Wefting Fibers Demonstration taken from Lesson 19.

Complete 6-Day Dollmaking Workshop on DVD Suitable for all skill levels

Mermaid Case Outside

Mermaid Case Outside

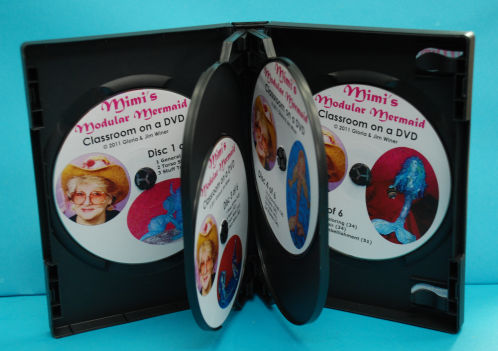
Mermaid Case Inside

Mermaid Case Inside

  • 6-disc DVD set with 12 hours 58 minutes of over-the-shoulder classroom video.
  • 20 Lessons with 163 easy-to-navigate chapters covering every aspect of mermaid construction.
  • Electronic pattern sheet on the first DVD. Printed pattern sheet on lightweight paper optional.
  • 1″ thick 6-disc DVD plastic case for storage.

Filled with the complete contents of Mimi’s 6-day dollmaking workshop.

Suitable for all levels. If you can do basic machine sewing to make the seams on the torso and tail, you will learn everything else you need from watching the step-by-step video.

What You Will Learn:

  • Precision machine sewing.
  • Stuffing smoothly and firmly using the right tools.
  • How to make your seams beautiful so that they are part of the design.
  • How to make your own finger-turning tools and easily turn tiny fingers.
  • How to make hands that can grasp objects.
  • How to make webbed hands without having to turn fingers.
  • How to make and needle model a lovely female torso.
  • How to make 3 types of poseable hands and arms.
  • How to make 4 different poseable tails.
  • How to make 3 different types of flukes.
  • How to create many different poses using modular arms, tails, and flukes.
  • How to needle model a female face.
  • How to use dyes and watercolor effects to paint mermaids.
  • How to bead a stuffed figure.
  • How to weft mohair and other fibers for wigging a doll.

Contents:

  • Disc 1
    • 01 Introduction (45 min)
    • 02 Sewing Torso Skin (41 min)
    • 03 Stuffing Torso (26 min)
  • Disc 2
    • 04 Needle-Model Torso (56 min)
    • 05 Webbed Arms (46 min)
    • 06 Poseable Hands (29 min)
  • Disc 3
    • 07 Poseable Arms (42 min)
    • 08 Sewing Head Skin (32 min)
    • 09 Needle-Model Nose (37 min)
    • 10 Needle-Model Eyes (30 Min)
  • Disc 4
    • 11 Needle Model Mouth & Close (54 min)
    • 12 Ears (20 min)
    • 13 Tails (41 min)
    • 14 Flukes (36 min)
  • Disc 5
    • 15 Wall Doll Variation (53 min)
    • 16 Overhead Flukes Variation (55 min)
    • 17 Other Variations (4 min)
  • Disc 6
    • 18 Coloring (34 min)
    • 19 Hair (46 min)
    • 20 Embellishing (51 min)

To order your copy at 20% discount ($47.96) until 7/31/2011, please visit Mimidolls.Com.

Share

Letters to the Editor – What Goes on Behind the Scene?

Both Mimi and Jim are writing this post, Basically, Jim is the active voice (me) and I will indicate things Mimi has said.

We got a very small number of complaints about various aspects of our Needle Model a Pretty Face DVD. If you want to understand the complaints you’ve got to understand the players. So, here’s a quick rundown of the Entire cast of three characters:

Mimi’s a double genius! She’s a genius at designing and making dolls, and she’s a genius at teaching others to learn techniques they can apply to their own doll creations. Mimi’s an Artist. Mimi is also the originator of doll class conventions. Back in the 1990’s Mimi wanted to study with Lisa Lichtenfels (NIADA). Lisa was willing to teach a class to make the travel and time away from her work palatable, and Mimi was too broke to pay Liza’s fee and her own travel expenses, and so the first Master Artist Class at Dollmaker’s University took place in Mimi’s basement. Mimi found nine other dollmakers who wanted to take a class with Lisa. Mimi extended the idea to some of the NIADA (National Institute of American Doll Artists) artists trying to find a way to pay for their trip to the NIADA Conventions and helped set up the teaching programs at NIADA. She took the same idea to magazine editors, and store owners, and others, and soon there were dollmaking conventions open to the general public and advertised in major crafts magazines where you could go to take classes from other well-known doll artists.

Jim’s a computer nerd and a writer, and an illustrator, and a photographer, and anything else technical that you could think of. Jim’s currently available. Project Managers should visit JimWiner.Com to find out how to get good technology writing to the people who need it, when they need it, and how they need it.

So there is an Art Versus Technology “issue.”

Cassi’s the third person. Her job is to talk electronically to dollmakers and quilters in places where we don’t already know about them, and where they don’t know about us. We used to have 50,000 cloth doll makers a few years ago Maybe we still do, but most of them are not on the Internet? What will happen if we work together as a family? Can we get more people interested in the hobby of cloth dollmaking?

Mimi is an Artist. She has specific ways of working. She is not a Television Actress. She gets involved in what she’s doing and gets off her mark and you can’t see her for a while. I tried actually operating the camera when we started. She moves too fast! I can’t follow her fast with a close-up – she out runs the camera, and worse, it tries to autofocus because she’s moving. Shooting over her shoulder with a video monitor in front of her, we had two choices: 1) use a wide field of view which would let her move around more, but what she was doing would be very hard to see because it was too far away and small, 2) use a narrow field of view (that means we have to lock the autofocus because she gets her head in front of the camera) and she gets out of her spot where you can’t see her occasionally because she forget’s to look at the monitor. The compromise we got worked fairly well. It prevented Mimi from moving around too much and we got a pretty good DVD.

The sound could have used some improvement, but it’s the first time I actually edited the sound as well as the picture and the story.

So, basic technical and artistic issues aside, here are some of the comments we got and Mimi’s answers to them:

Q: I want the doll face to be of the same fabric as the rest of the doll.

MIMI: It takes a knit or quite stretchy fabric to stitch a face with lots of detail. However, until last year, I never used an overlay.

My dolls were mostly all muslin. If you put the face pattern on the bias of the woven fabric you will have a bit more stretch. You will be able to do a closed mouth but not an open one – it takes a great deal of stretch to  create an open mouth. Most folks do not like a seam down the front of the face, but that is not why I began using the overlay. The knit or spandex overlay allows me to get much more detail in the face.

Without an overlay you will need a center front seam on the head or you cannot have a profile or even a nose that actually look like a nose. That is why I have a “skull” under the overlay it has a seam so the face will have a
realistic nose. If the seam allowance is kept narrow , evenly trimmed and straight the seam will not be noticeable. To make the seam “disappear” be sure the seam allowance is even, notched and snipped so it follows the curve of the head. if the seam allowance becomes twisted it will cause a bump, usually on the forehead or at the tip of the nose and that is the first thing one sees when viewing the doll.

My patterns of Jazz and Victoria Rose are made from muslin and have faces of muslin, They are “stump” heads, which are part of the torso, the face is added after the torso is stuffed but the face is also muslin. needle modeling instructions are included.

You can use the DVD instructions on a doll face without an overlay but use the directions for a closed mouth. Use the nose on the skull and the eyes and mouth for the overlay. It is quite doable,

Q: I like movable joints, including the neck.

MIMI: I used joints on my early dolls, The Universal Toddler and Earth Angels. but for the past 20 or so years I have preferred head and arms stitched into the pose I want. Unless the dolls are to be toys for a child
who will constantly repose them, joints are not necessary. (In my opinion.)

Q: I want the naked bald doll to be as beautiful as the finished doll with clothes and hair.

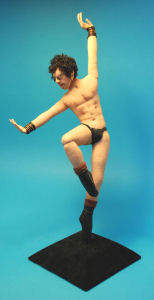
So Do I, That’s why I like to do dancers with as little clothing as possible.
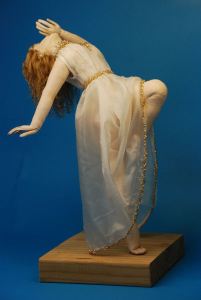
High Priestess

Mimi's High Priestess

Moon Dancer Side

Drawing Down the Moon

Michael Dances Spartacus

Michael Dances Spartacus

After working for many years to perfect my realistic human bodies I hate to cover them up. You can have a bald head, but you have to use the directions on the DVD for covering the back of the head. The needle modeling of the face usually distorts the back and top of the head. I simply cut an oval of knit or woven fabric (cut on the bias) and stitch it to the back of the head. Before I finish stitching the covering closed I stuff a bit of fiberfil inside to re-shape the back of  the head and the top if it needs it.  If you look a the photos of the heads on my DVD cover you will see that my hairless head looks just fine. It does not have to be lumpy and ugly. That’s why I shape the overlay pattern to fit the head not just use a circle or oval of fabric and glue the overage to the back of the head as some do.


Q: I would like more information on differences in the face for a male
face, a child face, a baby face and different emotions.

MIMI: A baby face has all the features in the lower half of the face, the lower the features the younger the face.

A male face has a square jaw, slightly longer chin, a wider mouth and a larger and often longer nose. Eventually I may do a DVD for where to put the dots for masculine and ethnic faces as well as children. The technique is exactly the same, the difference is where you put the dots and how you design the skull shape.

There are several sections in the DVD that show how to get emotion by moving the brows, cheeks, and corners of the mouth.

Incidentally, if you sign up for an email subscription using the button on the bottom right of the screen, we’ll tell you by email every time something new is posted.

Share

Drawing Down the Moon (The Workshop)

She’s finished! You can learn to make her. I will be teaching a three-day workshop next April 29-31, 2011 at Artistic Figures in Cloth in Columbus, Ohio. For more information, please visit: http://www.cyndysdolls.com/index.htm

High Priestess

Here’s The class description:

The High Priestess is a beautiful, young female dancing figure. She is posed on one leg with the other knee raised high. One arm is over her head and the head is bent backward. She wears only a diaphanous silk chiffon gown. Her hair hangs freely down her arched back. High Priestess Drawing Down the Moon is a 19 inch fabric sculpture. This three-day intense class is designed for the advanced skilled doll maker. However intermediate doll makers would qualify if you have very good hand sewing skills. As you can imagine creating a doll of with such natural beauty takes time and skill. This is a class you will never forget, and you will acquire skills of concentrated precision. You will need to do your homework before coming to class. The homework is basic but it must be done in order not to be an interruption to the other students in the class.

Home work will start with Gloria mailing you the pattern, sewing instructions, fabric and dream-seamer tool. She will send this to each student 4 to 6 weeks prior to class. The entire doll skin and head must be stitched prior to class.

Day One:  In class you will wrap a wire armature; insert it into the sewn torso and stuff firmly and smoothly around the armature. The torso will be closed and needle modeled to form the musculature of a young female dancer. Legs will be trimmed, treated, turned, armature inserted and stuffed.

Day Two:  Gloria will instruct you how to stuff the sewn skull and affix the cotton-spandex overlay. The nose, eye-sockets, dimensional eyes, jaw and open mouth will be modeled and stitched. Ears will be stuffed, needle modeled, stitched and affixed to the head Students are encouraged to pre-stitch two or more heads.

Day Three:  The head will be pinned and stitched to the torso. Hands will be constructed of wire woven and wrapped with floral tape and inserted into sewn turned gloves. Arms will  be armatured and stuffed, assembled and attached to the torso. Legs will be pinned in place using a master drawing as a pattern for accuracy and balance. Time permitting, costuming and wigging as well as coloring face and hands and painting boots will be discussed and demonstrated.

This class is all about learning new techniques, not completing a doll. Complete instructions will be handed out in class which will help to complete the figure at home.  Some advanced students and those who work after class may just finish the piece in three days.

Here’s what else is going on! Continue reading

Dollmaking Workshop on DVD — Mimi’s Needle Model a Pretty Face

Saturday, August 7,  Cassi and I attended Day with Dolls in a really nice church in Bronxville, New York. It was less than a two-hour drive from home early on Saturday morning.  I was demonstrating how I needle model a face, and I just happened to have my new DVD with me.

Here’s what Mary Ann Kaahanui of DollmakersJourney.com had to say about it:

“It was such a treat to see one of the world’s best dollmaking teachers Gloria “Mimi” Winer at Day with Dolls in New York.  During the day she slipped [me] a DVD and said: ‘Let me know what you think about this…’  Well, our dear dollmaking friends, get ready – Mimi and her husband Jim have taken the material that Mimi teaches in a 2 day Needle Sculpting Class and produced a PHENOMENAL FIVE HOUR LONG 2 DISC DVD called “Needle Model a Pretty Face” that is going to knock your socks off!  We pride ourselves on the variety of needle sculpting products we carry but for all of you who really want to learn by following along with a DVD the wait is over.  You will feel like Mimi is sitting right next to you and the wealth of doll making knowledge she shares with you is absolutely priceless.  The DVD is arranged so that you can easily navigate around the 31 detailed chapters that cover every aspect of the head construction.  You can watch it on your TV or your computer whichever is more convenient.  We are waiting anxiously for the first shipment to arrive and will let you know when it does so keep an eye on the site.  Your reference library will be screaming for this DVD!!!”

Needle Model a Pretty Face

You can get a copy of the DVD from either DollmakersJourney.com or from Mimidolls.com BUTit’s on sale at DollmakersJourney.com from now until the end of August for 20% off. Get it before the end of August from DollmakersJourney.com and save up to $8.

DVD 2 Disc Set

Includes 2 copies of pattern Sheet

Here’s some more information:

Mimi’s Needle Model a Pretty Face
Complete 2-Day Dollmaking Workshop on DVD

2 copies of the pattern sheet printed on heavy card stock.

2-disc DVD set with 4 hours 48 minutes of over-the-shoulder video.

Standard 2-disc DVD plastic case for storage.

Suitable for all levels. If you can do basic machine sewing to make the seams on the skull and the darts on the face overlay, you will learn everything else you need from watching the step-by-step video.

Contents:

  • Disc 1
    • Introduction
    • 01 Make Templates
    • 02 Layout & Stitch Skull
    • 03 Trim & Snip Seams
    • 04 Turn Skull
    • 05 Stuff Skull
    • 06 Needle Model Nostrils
    • 07 Needle Model Nose Flairs
    • 08 Needle Model Nose Bridge
    • 09 Set Nose into Skull
    • 10 Add Stuffing
    • 11 Finding Right Side of Knit
    • 12 Layout & Stitch Overlay
    • 13 Pinning Overlay to Skull
    • 14 Sculpting Nose
    • 15 Sculpting Eyeballs
    • 16 Sculpting Brow Bones
    • 17 Sculpting Lower Eye Socket
    • 18 Making Adjustments
  • Disc 2
    • 19 Locate Closed Mouth
    • 20 Closed Mouth Upper Lip
    • 21 Closed Mouth Lower Lip
    • 22 Closed Mouth Fix Smile
    • 23 Cheekbones, Brow, & Chin
    • 24 Closing Head
    • 25 Ears
    • 26 Coloring the Face
    • 27 Sketch Open Mouth
    • 28 Open Mouth Upper Lip
    • 29 Open Mouth Lower Lip
    • 30 Open Mouth Teeth & Smile
    • 31 Open Mouth Cheeks & Chin
    • Sources

This pattern can be reduced or enlarged for use on any cloth character doll.

You are licensed to sell dolls made from this pattern.

Share

The Elves are Coming to Danbury, Connecticut

The Elves are coming, The Elves are coming…
Friday March 12 – Sunday March 14, 2010
Danbury Plaza Hotel
18 Ridgebury Road
Danbury, CT

Mimi's Elf - Sparki

Mimi's Elf - Sparki

Mimi's Elf - Kasi

Kasi

Mimi's Elf - Cedrick

Cedric

For the past few months Gloria has been working on a series of 7” elves. They have long Elvin ears, little round tummies, short legs and arms and separate fingers, with a new way of wiring them. Their faces are adult faces but their bodies look child-like.

The three-day workshop will be held at the Danbury Plaza Hotel. The cost for all three days is $200.00.

Accommodations at the Danbury Plaza Hotel, which includes a hot American Breakfast are $109 plus taxes per night – single or double occupancy – so bring a creative friend. The Danbury Plaza Hotel is 10 minutes from Metro North – Brewster Station. Shuttles are available to the Station. It is a 50 minute trip from White Plains to Brewster.

You can choose to enjoy wonderful lunches with your fellow artists or bring a packed lunch. The three-day lunch ticket is $40.00.

This is a unique opportunity to spend three days with Gloria and other doll artists at the lovely Danbury Plaza Hotel. For more information, visit http://www.art-is-you.com

Share

The Elves are Coming, The Elves are Coming

Mimi's Elf - Sparki

Mimi's Elf - Sparki

For the past few months I have been working on a series of 7” elves.  They have long Elvin ears, little round tummies, short legs and arms and separate fingers, with a new way of wiring them. Their faces are adult faces but their bodies look child-like.

They look cute naked but I am busy dressing a litter of 9 of them.  As I complete them I will show their photos here.

Continue reading